Dekompilacja, Rekompilacja, Podpisanie:
1. Ściągamy najnowszą wersje https://drive.google.com/folderview?id=0B6-9-IIam8f-WFU5UTI2bTZVaE0#list , rozpakowujemy i uruchamiamy
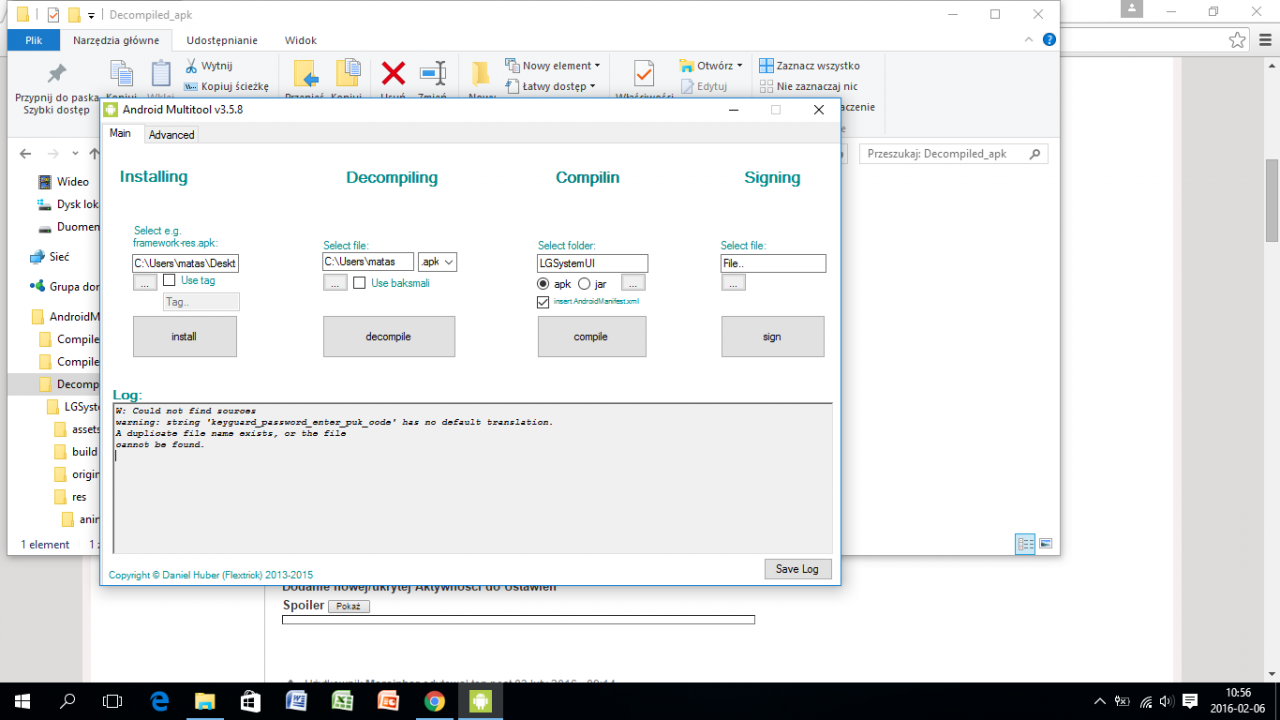
2. W dziale Installing wybieramy framework-res.apk i lge-res.apk i wciskamy install
3. W dziale Decompiling wybieramy aplikacje do dekompilacji i wciskamy decompile
4. Wchodzimy do folderu Decompiled_apk, modyfikujemy aplikacje
5. W dziale Compilling wybieramy folder który modyfikowaliśmy i zaznaczamy insert AndroidManifest.xml i wciskamy compile
6. W dziale Signing wybieramy aplikacje z folderu Compiled_apk i wciskamy sign (Krok pomijamy dla aplikacji systemowych tj. LGSystemUI.apk, framework-res.apk)
7. Podmieniamy aplikacje w telefonie i ustawiamy uprawienia takie jakie były (zazwyczaj 644, rw-r--r--)
Modyfikacje:
Efekty odblokowania ekranu [Kitkat][Lollipop]
1. Dekompilujemy LGLockScreenSettings.apk
2. Otwieramy res\values\bools.xml
3. Szukamy <bool name="config_feature_effect_menu">false</bool>
4. false zmieniamy na true
Wszystkie efekty odblokowania ekranu[Kitkat][Lollipop]
1. Dekompilujemy LGLockScreenSettings.apk
2. Otwieramy res/values/arrays.xml
3. Szukamy
<string-array name="effect_names">
.......................................................
</string-array>
[Kitkat]
Zmieniamy na
<string-array name="effect_names">
<item>@string/lockscreen_effect_basic</item>
<item>@string/lockscreen_effect_spreadingink</item>
<item>@string/lockscreen_effect_hula_hoops</item>
<item>@string/lockscreen_effect_particle</item>
<item>@string/lockscreen_effect_dewdrop</item>
<item>@string/lockscreen_effect_crystal</item>
<item>@string/lockscreen_effect_ripple</item>
<item>@string/lockscreen_effect_white_hole_alias</item>
<item>@string/lockscreen_effect_ocean</item>
<item>@string/lockscreen_effect_vector_circle</item>
<item>@string/lockscreen_effect_mosaic</item>
<item>@string/lockscreen_effect_light_particle</item>
<item>@string/lockscreen_effect_soda</item>
</string-array>
Analogicznie zmieniamy na
<string-array name="effect_values">
<item>@string/effect_index_swipe_basic</item>
<item>@string/effect_index_swipe_spreadingink</item>
<item>@string/effect_index_swipe_hula_hoops</item>
<item>@string/effect_index_swipe_particle</item>
<item>@string/effect_index_swipe_dewdrop</item>
<item>@string/effect_index_swipe_crystal</item>
<item>@string/effect_index_swipe_ripple</item>
<item>@string/effect_index_swipe_white_hole</item>
<item>@string/effect_index_swipe_ocean</item>
<item>@string/effect_index_swipe_vector_circle</item>
<item>@string/effect_index_swipe_mosaic</item>
<item>@string/effect_index_swipe_light_particle</item>
<item>@string/effect_index_swipe_soda</item>
</string-array>
<string-array name="secondary_effect_names">
<item>@string/lockscreen_effect_basic</item>
<item>@string/lockscreen_effect_spreadingink</item>
<item>@string/lockscreen_effect_hula_hoops</item>
<item>@string/lockscreen_effect_particle</item>
<item>@string/lockscreen_effect_dewdrop</item>
<item>@string/lockscreen_effect_crystal</item>
<item>@string/lockscreen_effect_ripple</item>
<item>@string/lockscreen_effect_white_hole_alias</item>
<item>@string/lockscreen_effect_ocean</item>
<item>@string/lockscreen_effect_vector_circle</item>
<item>@string/lockscreen_effect_mosaic</item>
<item>@string/lockscreen_effect_light_particle</item>
<item>@string/lockscreen_effect_soda</item>
</string-array>
<string-array name="secondary_effect_values">
<item>@string/effect_index_swipe_basic</item>
<item>@string/effect_index_swipe_spreadingink</item>
<item>@string/effect_index_swipe_hula_hoops</item>
<item>@string/effect_index_swipe_particle</item>
<item>@string/effect_index_swipe_dewdrop</item>
<item>@string/effect_index_swipe_crystal</item>
<item>@string/effect_index_swipe_ripple</item>
<item>@string/effect_index_swipe_white_hole</item>
<item>@string/effect_index_swipe_ocean</item>
<item>@string/effect_index_swipe_vector_circle</item>
<item>@string/effect_index_swipe_mosaic</item>
<item>@string/effect_index_swipe_light_particle</item>
<item>@string/effect_index_swipe_soda</item>
</string-array>
[Lollipop]
Zmieniamy na
<string-array name="effect_names">
<item>@string/lockscreen_effect_basic</item>
<item>@string/lockscreen_effect_light_particle</item>
<item>@string/lockscreen_effect_vector_circle</item>
<item>@string/lockscreen_effect_mosaic</item>
<item>@string/lockscreen_effect_soda</item>
<item>@string/lockscreen_effect_water_ripple</item>
</string-array>
Analogicznie zmieniamy na
<string-array name="effect_values">
<item>@string/effect_index_swipe_basic</item>
<item>@string/effect_index_swipe_light_particle</item>
<item>@string/effect_index_swipe_vector_circle</item>
<item>@string/effect_index_swipe_mosaic</item>
<item>@string/effect_index_swipe_soda</item>
<item>@string/effect_index_swipe_water_ripple</item>
</string-array>
<string-array name="secondary_effect_names">
<item>@string/lockscreen_effect_basic</item>
<item>@string/lockscreen_effect_particle</item>
<item>@string/lockscreen_effect_dewdrop</item>
<item>@string/lockscreen_effect_crystal</item>
<item>@string/lockscreen_effect_ripple</item>
<item>@string/lockscreen_effect_white_hole_alias</item>
</string-array>
<string-array name="secondary_effect_values">
<item>@string/effect_index_swipe_basic</item>
<item>@string/effect_index_swipe_particle</item>
<item>@string/effect_index_swipe_dewdrop</item>
<item>@string/effect_index_swipe_crystal</item>
<item>@string/effect_index_swipe_ripple</item>
<item>@string/effect_index_swipe_white_hole</item>
</string-array>
Qslide[Kitkat][Lollipop]
1. Dekompilujemy LGSystemUI.apk
2. Otwieramy res\values\bools.xml
3. Szukamy config_systemui_feature_qslide
4. false zmieniamy na true
Tryb wielu użytkowników[Kitkat][Lollipop]
Do pliku build.prop dodajemy
fw.max_users=3
fw.show_multiuserui=1
Dodanie nowej/ukrytej Aktywności do Ustawień[Kitkat][Lollipop]
1. Dekompilujemy LGSettings.apk
2. Szukam informacji o naszej Aktywności.
a. Dekompilujemy aplikacje np LGSettings.apk
b. Otwieramy plik AndroidManifest.xml
c. W znaczniku <manifest> szukamy parametru package, to jest nasz android:targetPackage np. com.android.settings
d. Szukamy znacznik <activity> (będzie ich kilka, wybieramy który nas interesuje) i szukamy w nim android:value, będzie on rozwinięciem android:targetPackage np. com.android.settings.lge.FrontTouchKey
Dodanie nowej/ukrytej Aktywności do głównych ustawień
1. Otwieramy res\xml\settings_header.xml
2. Wybieramy kolejność wyświetlania aktywności analizując cały plik. Najlepiej spoglądać na parametr android:icon a ikonę znajdujemy w drawable-hdpi-v4 lub android:title gdzie nazwę znajdujemy w res\values\strings.xml (dla polski values-pl)
3. Wklejamy np.
<header android:icon="@drawable/nazwa_ikony" android:title="wyswietlana_nazwa">
<intent android:targetPackage="com.android.settings" android:action="android.intent.action.MAIN" android:targetClass="com.android.settings.lge.FrontTouchKey" />
</header>
a. android:icon to nasza ikona szukamy jej w drawable-hdpi-v4 lub wklejamy ja to tego folderu i zmieniamy nazwę.
b. android:title to nazwa wyświetlana obok ikony
4. Kompilujemy
Dodanie nowej/ukrytej Aktywności do pod-ustawień
1. Otwieramy np res\xml\display_settings.xml - ustwienia wyświetlacza, lub sound_settings.xml - ustawienia dźwieku itp.
2. Wybieramy kolejność wyświetlania aktywności analizując cały plik. Najlepiej spoglądać na znacznik <PreferenceCategory> i android:title gdzie nazwę znajdujemy w res\values\strings.xml (dla polski values-pl)
3. Wklejamy np.
<Preference android:title="wyswietlana_nazwa" android:key="front_touch_key" android:summary="tekst_wyswietlany_pod_nazwa">
<intent android:targetPackage="com.android.settings" android:action="android.intent.action.MAIN" android:targetClass="com.android.settings.lge.FrontTouchKey" />
</Preference>
a. android:title - jest to nazwa wyświetlana obok ikony
b. android:summary - jest to tekst wyświetlany małymi literami pod android:title (parametr opcjonalny)
4. Kompilujemy
Uwagi
1. Każdy tekst lub nazwa powinna znajdować się w pliku res\values\strings.xml a tłumaczenie np dla Polski res\values-pl\strings.xml
2. Jeśli dodajemy ukrytą aktywność przez LG często jego nazwy znajdują się w wraz z tłumaczeniami w pliku strings.xml i odwołujemy się do nich np. android:title="@string/display_home_touch_buttons"
3. Nie usuwamy, ani nie modyfikujemy innych ustawień tylko dodajmy nowe.
Lista ukrytych Aktywności
<intent android:targetPackage="com.android.settings" android:action="android.intent.action.MAIN" android:targetClass="com.android.settings.lge.FrontTouchKey" />
<intent android:targetPackage="com.android.settings" android:action="android.intent.action.MAIN" android:targetClass="com.android.settings.applications.AccessLockSummary" />
<intent android:targetPackage="com.android.settings" android:action="android.intent.action.MAIN" android:targetClass="com.android.settings.NotificationAccessSettings" />
<intent android:targetPackage="com.android.settings" android:action="android.intent.action.MAIN" android:targetClass="com.android.settings.defaultapp.DefaultAppActivity" />
<intent android:targetPackage="com.android.settings" android:action="android.intent.action.MAIN" android:targetClass="com.android.settings.Settings$ButtonCombinationDragActivity" />
<intent android:targetPackage="com.android.settings" android:action="android.intent.action.MAIN" android:targetClass="com.android.settings.users.KidsModeMainActivity" />
<intent android:targetPackage="com.lge.launcher2" android:action="android.intent.action.MAIN" android:targetClass="com.lge.launcher2.theme.LGThemeChooserActivity" />
Jeśli ktoś znajdzie jakąś aktywność niech da znać i napisze jaka wersja systemu.
Opcja HDR w aparacie[Kitkat][Lollipop]
1. Otwieramy plikcamera_config.xml znajdujący się w /system/etc
2. Znajdujemy<item name="hdr_supported">0</item>
3. Wartość 0 zmieniamy na 2
Opcja Knock ON i Tryb Cichy[Kitkat][Lollipop]
1. Otwieramy pliksetting_features.xmlznajdujący się w/system/etc
2. Znajdujemy linie z naszym modelem telefonu (nasz to e2n)<Model name="e2n" extends="default">jeśli nie ma danej opcji szukamy w <Model name="default">
3. Dla Knock ON wartość miedzy<knockondisplay>false</knockondisplay>zmieniamy zfalsenatrue
3. Dla Tryb Cichy wartość miedzy <usequietmode>false</usequietmode>zmieniamy zfalsenatrue
a. Dekompilujemy LGSystemUI.apk
b.Otwieramy res\values\bools.xml
c. Wartość przyconfig_systemui_feature_quietzmieniamy zfalsenatrue
Widok zakładek w Ustawieniach[Kitkat][Lollipop]
1. Szukamy i Instalujemy aplikacje LGEasySettings.apk
Miniview[Kitkat][Lollipop]
1. Szukamy i Instalujemy aplikacjeOneHandController.apk
2. Dekompilujemy LGSystemUI.apk
3. Otwieramyres\values\bools.xml
4. Wartość przyconfig_systemui_feature_one_hand_operation_miniview i config_systemui_feature_one_hand_operation_swipe_keyzmieniamy z false na true
Podwójne okno - Splitwindow[Kitkat]
Zródło: http://forum.xda-developers.com/showthread.php?t=2792938
1. Dekompilujemy2 pliki telephony-common.jar icom.lge.frameworks.jarznajdujący się w /system/framwork/
2. Znajdujemy plikgenerated/ConfigBuildBase.smali
3. Szukamy sput-boolean v0, Lgenerated/ConfigBuildBase;->CAPP_SPLITWINDOW:Zorazsput-boolean v0, Lgenerated/ConfigBuildBase;->CAPP_SPLITWINDOW_:Z
4. Wartośćv0 zmieniamy nav1
5. Dekompilujemy LGSystemUI.apk
6. Otwieramyres\values\bools.xml
7. Wartość przyconfig_systemui_feature_recent_dualwindowzmieniamy zfalsenatrue
8. Wrzucamy do telefonu:
a.SplitWindowService.apkdo /system/priv-app/
b. com.lge.zdi.splitwindow.jar do /system/framework/
c.com.lge.splitwindow.autosplit_rules.xmldo /system/etc/
d.com.lge.splitwindow.default_apps.xmldo /system/etc/
e.com.lge.zdi.splitwindow.xmldo /system/etc/permissions/
9. Dodajemy do build.prop
a.persist.splitwindow.support_all=true
b.ro.lge.capp_splitwindow=true
Wsparcie init.d[Kitkat][Lollipop]
1. Otwieramy plikinit.qcom.post_boot.shznajdujący się w/system/etc/
2. Na końcu pliku dopisujemy busyboxrun-parts /system/etc/init.d
3. Nadajemy uprawnienia 644 (rw-r--r--)
4. Tworzymy folder init.d w/system/etcz uprawnieniami 777 (rwxrwxrwx)
Do poprawnego działania wymagany busybox
Roboczy:
Equalizer w LGMusic[Kitkat][Lollipop]
1.Otwieramyplikcom.lge.music.xmlznajdujący się w/system/etc/ lubtworzymynowy
2. Zmieniamy lub dodajemy linie<audio_effect data="true" /> dla odblokowania funkcji w ustawieniach
3. Zmieniamy lub dodajemy linie<eq_through_speaker data="true" />dla odblokowania funkcji w ustawieniach dla głośnika
4.Zmieniamy lub dodajemy linie<audio_effect data="dolby" />dla dolby eq
5.Zmieniamy lub dodajemy linie<id3tag_editor data="true" />dla ID3TAG
Przykładowy plik: http://www5.zippyshare.com/v/mrGmCdFf/file.html